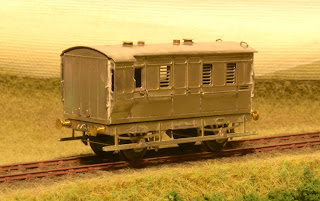
This is the first major item put together from my recent etch. It is modelled on Highland Railway passenger brake van No. 5, as preserved at the SRPS in Bo'ness, and drawn on p.101 of Peter Tatlow's book. Pete Armstrong has also modelled this van in 7mm scale, in his case from the Lochgorm Models kit (see his blog here).
Still missing are vacuum pipes and handwheels, which I will add after painting because I need to make sure that I don't foul the couplings. Glazing will be added simply by slotting into the sides. The white bits are Milliput that I used to fill in some gaps where the parts join together.
Like my previous attempt at a Jones 6-wheel coach, the sides fold up from several layers. This time, I included fold-out footsteps on the inner layer of the end, which fit through slots in the outer layer. I'm very pleased with how it has turned out. The only errors were that I forgot quite a lot of the handrail holes on the inner-most layers. These were easily drilled out, however. Also, I included the handrails on the etch, but these proved too fragile and I replaced them with 0.3mm nickel silver wire.
The photo below shows that there are three main pieces. A 12BA nut is soldered on the inside of the floor (see bottom photo), and this will be used to screw on the chassis. Notice the etched tab on the chassis that locates through a corresponding slot in the floor of the body, to make sure that the two mate together squarely. I'm also showing you the roof here. Following problems trying to bend the full 10 thou thickness for my previous coach, I half-etched much of the material away, just leaving a strip around the edge and a series of longitudinal ribs. This made it much easier to get the curve parallel along the length of the roof, and bending was quite straightforward. I've modelled the lamp-holders in "day time" condition, i.e. no lamps. The covers (and the holes into which the covers fit when lamps are fitted) are made from lengths of brass tube. This was a bit labour intensive so I would quite like to find a quicker method in future.
How exactly I will attach the roof remains to be seen - you can see that it locates on a tab sticking up from the interior spacer. I should probably have included one at the other end. I might even solder in a 12BA nut and use the same fixing screw to attach it, but I don't know whether this will hold the roof down sufficiently around the edges. I may need to glue it. It can't be fixed until after painting because the glazing needs to slot down from the top of the sides - you can just about see the slots in the photo below.


1 comment:
Very nice Anthony. I like the idea of providing a slot for the glazing.
For holding the roof on I used miniature magnets on one of my brake vans - a 0.5mm thick magnet being epoxied into the deepest part of the roof at each end, and a thin piece of steel on a scrap of etch bridging across the sides. It was an idea that I pinched from Andy Carlson (he even provided me with the magnets, but I've since obtained a few of my own from eBay). You wouldn't believe how firmly the roof is held on with this method - it might be necessary to add little squares of plastic in the roof corners to ensure that it is held on square, I haven't on mine nut Andy did on his. Hope that helps.
Ian
Post a Comment