Monday 25 September 2017

Station building

In recent weeks (months?) I've been working on the station building for Corrieshalloch. The styrene shell was covered in a layer of Fimo air drying clay (similar to DAS), glued on with PVA. Once dry, I carved the stonework courses using a needle held in a pin vice. The clock face (between the bottom left windows) is made from a short length of brass tube set in the wall and filled with filler.


The roof is a separate, removable unit. It has a basic structure of styrene with slates made from strips of paper, as for the goods shed. Slating was a little tedious owing to the three dormer windows and many angled cuts required. Microstrip was used to create the guttering and fascia boards around the outside. The chimneys are covered in clay like the main walls of the building.


The chimney pots are quite exciting (for me) as they are turned brass, and are the first items that I've made on my lathe (a Sherline). I was pleasantly surprised with how easy this was. I had to grind a left-handed turning tool (from 1/8" HSS bar), as the lathe only came with a right-handed tool and I needed to get into both sides of the bits that stick out (technical term?). I wasn't sure whether I could do this grinding operation on my little LIDL bench grinder, but it worked a treat. It actually took me a few months to work up the confidence to try making something on the lathe, but I needn't have worried and I'm looking forward to finding uses for it in future. It was quite fun trying to puzzle out the best order in which to make the cuts (the chimneys also have integral spigots for fitting in the roof). I don't have a parting tool so simply cut them off with a piercing saw. I think the results are at least better than the white-metal castings that I have in the drawer (and used for the goods shed).


Tuesday 6 June 2017

Goods shed progress

The goods shed was actually the first structure that I started, a few years back now. I recently decided to progress it further, which basically meant adding the roof, doors and windows. It is entirely modelled in styrene, except for the paper strip roof tiles (printed by computer), the brick paper covering the chimney (from the http://scalescenes.com free demo kit), and the chimney pot (a white metal casting of unknown provenance).

You can see that I've made a start on painting, although there is definitely more weathering to do. I'm going to leave this for the moment and try to blend it into the whole scene at a later stage. Missing also at present are the interior crane and the enamel advertising signs which seemed to grace most of these sheds in photographs of the period. According to Highland Railway Liveries, the shed walls were creosoted, while the doors and windows were painted burnt sienna. I've not found much guidance on how dark or light a shade of burnt sienna was used. so I opted for a reasonably light one as seems to be suggested by the black-and-white photos. Perhaps someone will correct me.

Another couple of problems to be fixed are (1) the gap around the bottom of the building, and (2) the lack of lighting on its front face. I cheated for these photos and used an extra lamp pointed at the layout, but in the long run I think I will need to add another strip of LEDs right at the bottom of the layout fascia.

Also in the top photo are some trees - I made a start on these a while back and need to make many more. They use traditional twisted copper wire, covered in solder. The foliage is represented by various products held on teased out Woodland Scenics poly fibre.

Evident also are the spaces where the station building and waiting shelter will go - these are on my to-do list!

Tuesday 21 March 2017

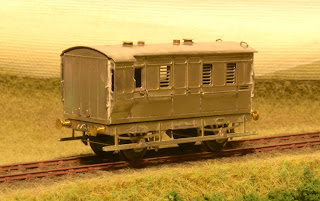
4-wheel passenger brake van

This is the first major item put together from my recent etch. It is modelled on Highland Railway passenger brake van No. 5, as preserved at the SRPS in Bo'ness, and drawn on p.101 of Peter Tatlow's book. Pete Armstrong has also modelled this van in 7mm scale, in his case from the Lochgorm Models kit (see his blog here).

Still missing are vacuum pipes and handwheels, which I will add after painting because I need to make sure that I don't foul the couplings. Glazing will be added simply by slotting into the sides. The white bits are Milliput that I used to fill in some gaps where the parts join together.

Like my previous attempt at a Jones 6-wheel coach, the sides fold up from several layers. This time, I included fold-out footsteps on the inner layer of the end, which fit through slots in the outer layer. I'm very pleased with how it has turned out. The only errors were that I forgot quite a lot of the handrail holes on the inner-most layers. These were easily drilled out, however. Also, I included the handrails on the etch, but these proved too fragile and I replaced them with 0.3mm nickel silver wire.

The photo below shows that there are three main pieces. A 12BA nut is soldered on the inside of the floor (see bottom photo), and this will be used to screw on the chassis. Notice the etched tab on the chassis that locates through a corresponding slot in the floor of the body, to make sure that the two mate together squarely. I'm also showing you the roof here. Following problems trying to bend the full 10 thou thickness for my previous coach, I half-etched much of the material away, just leaving a strip around the edge and a series of longitudinal ribs. This made it much easier to get the curve parallel along the length of the roof, and bending was quite straightforward. I've modelled the lamp-holders in "day time" condition, i.e. no lamps. The covers (and the holes into which the covers fit when lamps are fitted) are made from lengths of brass tube. This was a bit labour intensive so I would quite like to find a quicker method in future.


How exactly I will attach the roof remains to be seen - you can see that it locates on a tab sticking up from the interior spacer. I should probably have included one at the other end. I might even solder in a 12BA nut and use the same fixing screw to attach it, but I don't know whether this will hold the roof down sufficiently around the edges. I may need to glue it. It can't be fixed until after painting because the glazing needs to slot down from the top of the sides - you can just about see the slots in the photo below.

Friday 3 March 2017

On the bench

This little project was conceived to fill a corner of an etched sheet that I just got back from the etchers. (Of the rest of this sheet, more anon!) It is a Highland Railway bench of the type shown in Plate 178 of Peter Tatlow's Highland Miscellany. Some photos of a similar bench are available on the HR chat group.

The etch went together OK. Although these are cruel enlargements, I do wonder whether it was necessary to double-up the ends. They seem a bit chunky and were awkward to laminate, so on the second (identical) etch I may try a single layer. The twiddly details are rather impressionistic, but hopefully are vaguely reminiscent of the pattern of leaves on the real metalwork. I certainly don't see that I could have produced them by any means other than etching. Next question: what colour to paint it?